
This is the second entry in a saw sharpening serial. To ensure you don’t miss any future posts, you can subscribe to this blog by submitting your email address in the box to the right. You can also find related posts by searching this blog for “saw sharpening series”, or by visiting the full chronological index.
The series will be as comprehensive as possible without making it too tedious or dense for the writer or reader. Should the author belabor a point, it is because we believe it too important to leave unsaid or to chance. -Ed.
A brief look at manufactured saw vises, being the second part in a saw sharpening serial.
In the previous installment, we looked at the main criteria to consider when selecting a saw vise. In this installment, we will look at a few manufactured saw vises and briefly consider their qualities, both good and bad.
For our purposes, we will divide saw vises into two broad categories: manufactured and shop made. Almost invariably, manufactured vises are made from metal (usually cast iron), while shop made ones use wooden bodies. Over the last century and a half, dozens or hundreds of saw vise designs were patented or manufactured. How, then, does one go about selecting a vise suitable for its intended use?
If necessary, review the qualities of a good saw vise, then identify the saws that you will use the vise for. The larger the teeth you are filing, the more solid the vise needs to be. The force needed to file a 16 ppi dovetail saw is far less than that needed for a 4 ppi rip saw. While there are many vises that will work well for the former, the universe of acceptable vises for the latter is far smaller.
Unless you are filing teeth with sloped gullets, there is little need for a vise that pivots. Although it is a seductive feature, it is, in fact, often detrimental to the function of a vise since the pivoting mechanism introduces a point of rotation that almost inevitably reduces rigidity. The further this point of rotation is from the jaws, the worse this problem will be.
When you find a good candidate, examine it closely. Cracked or broken castings are usually, but not always, something to walk away from.
Check for wear on the moving parts, or the parts which they move against. The clamping mechanisms are particularly susceptible to wear over time. Dry cast iron on cast iron is bound to wear, and the inevitable contamination with stray saw filings only accelerates the process. In many cases, the cast iron becomes so worn that it is no longer capable of clamping a saw tightly. In some cases, this damage can be repaired or compensated for (the entry for the Disston 3D saw vise below has an example of this). Whether you find a good one or make repairs, it is prudent to prevent further wear by keeping the area free of filings and regularly lubricated with a dry lubricant (graphite, wax, etc.). Do not use grease or oil, as they will hold onto contaminants and exacerbate wear.
Many old saw vises had accomodations for leather or rubber jaw liners. These liners improved the grip of the vise, and reduced noise and vibration while filing. These liners are invariably missing or dried out. There are several possible replacements for these, including leather strips or laces and rubber window screen spline. Alternatively, you can stick a layer or two of painter’s masking tape on the saw blade just above the gullets.

Closeup of the dovetailed recess for a rubber insert in a Wentworth saw vise.
One final thing to consider when looking for and setting up your saw vise: height matters. Whether you sit or stand when filing, it is important not to have the saw teeth too high or low. Having your saw at the proper height (your forearm should be horizontal when filing) encourages proper technique and maximizes both comfort and control.
…the vise jaws should be placed so as to be level with the elbow of the workman…This position enables the workman to get the full, free swing of his arm from the shoulder; the separate movement of the wrist and elbow should be done away as much as possible.
-File Filosophy, Eleventh Ed., 1920, pp. 17-18
I have seen many people raise the saw up high in an attempt to see the teeth better, but it is better to address that issue with proper lighting or magnification.
Now, on to some real examples and pictures. The saw vises below are some of the more commonly found vises, and represent a variety of the better and most commonly found designs. Using a little common sense and the examples below as a framework, most other vises can be readily evaluated.
Disston No. 3D (sometimes called D3) saw vise
This is one of the better old saw vises made. For the most part, they make solid users, but there are some things to watch out for.

Front view of Disston 3D (sometimes called D3) saw vise.

Back side of Disston 3D (sometimes called D3) saw vise.

Back view of Disston 3D (sometimes called D3) saw vise. The pivoting mechanism is clearly visible in this view.
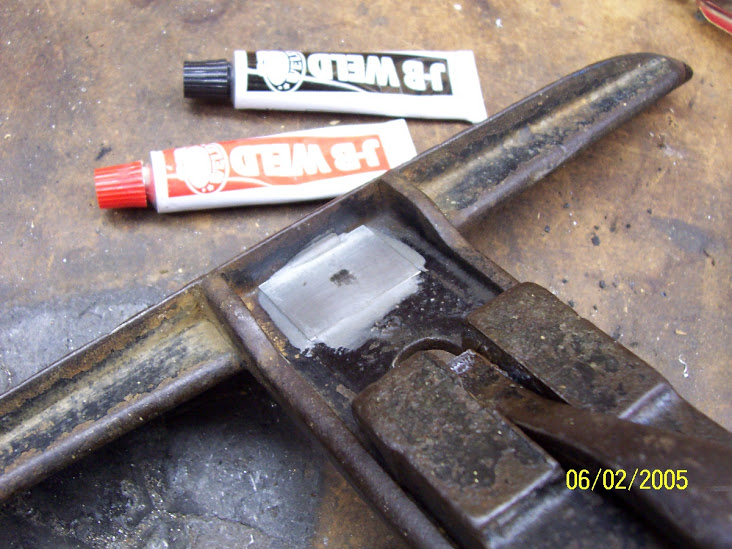
Besides checking for cracks, look for wear under the cam at the end of the handle. Often there is a divot worn there. This divot can be repaired with a bit of epoxy and a strip of steel banding or strapping or old saw plate to act as a wear strip, but this should be taken into account before the vise is purchased.

Divot worn into Disston 3D saw vise from years of dry use. The deeper the divot, the less clamping force there is.

Fix for divot in Disston 3D saw vise. A strip of steel banding works well for this repair.
Marv’s repair of the divot in one of his Disston 3D saw vises.

After the repair shown above, Marv added a bit of foam and metal to keep saw filings from getting down in the cam and wearing it further.
Perhaps the weakest point on this vise is the C-clamp. Its small size does not afford a very solid grip on the bench top, and makes it prone to moving about when filing. Fortunately, there is at least one workaround for this, which is fairly easy to do.
By removing the C-clamp and replacing it with a piece or two of angle iron, this saw vise is vastly improved. With this modification, you lose the ability to tilt the saw vise, but unless you are filing sloped gullets, that is of little consequence. Below are three examples of this modification, the first being a vise that I own, and the last two courtesy of Marv Werner, a highly respected saw filer working out of California.

Disston 3D saw vise bracket, front view.

Disston 3D saw vise bracket, rear
view.

Disston 3D saw vise bracket.

One of Marv’s Disston D3 vise mounting modifications, side view.

One of Marv’s Disston D3 vise mounting modifications, back view.

Another one of Marv’s Disston D3 vise mounting modifications, side view.

Another one of Marv’s Disston D3 vise mounting modifications, side view.
Disston No. 1 adjustable ball and socket saw vise
This vise’s most prominent feature is the ball and socket, which Disston proudly proclaimed allows a saw to be “held straight or at any angle, the operator may desire” (Henry Disston & Sons catalog, 1914). While this adjustability is a useful feature when filing sloped gullets, it should not be surprising that this versatility comes with a rather steep price; even with a coat of friction-enhancing rust, the ball and socket introduces a rather annoying degree of rotation and flexibility when filing any but the smallest of teeth.
As with the Disston 3D, the C-clamp base is a weak point. Unlike the 3D vise, there is no easy workaround for this one.
As a general rule, I do not care much for this type of vise. Unless you like to file sloped gullets, or are sharpening small teeth exclusively, you are better off looking for another vise.

Disston No. 1 adjustable saw vise, front view.

Disston No. 1 adjustable saw vise, side view. Vise is tilted as it would be for filing sloped gullets.
Stearns No. 33 adjustable saw vise
This vise is similar to the Disston No. 1 shown above. The main difference between the two is the location of the ball and socket joint. In this design, that joint is much nearer the teeth, “preventing the vice from vibrating while the saw is being filed” (E.C. Stearns & Co. 1924 catalog). While this upwards shift of the joint does indeed improve functionality, rigidity is still limited. As with the Disston Nos. 3D and 1, the C-clamp base is a weak point, and is not easily remedied. I still do not recommend this vise for filing larger teeth.

Stearns No. 33 adjustable saw vise, front view.

Stearns No. 33 adjustable saw vise, rear view. Note the larger pad brazed onto the original, probably in an attempt to make it more stable.
Wentworth No. 1 or 2 saw vise
This vise differs from the first three in that it is non-adjustable. Because of this, and despite its rather spartan looking design, it is a solid user. It can either be screwed directly to the front of your bench or to a board, and then clamped in a vise. In either case, this vise is about as solid as your bench and/or vise.
Again, check for wear before taking it home. This design has a fair tolerance for wear built into it, but still…
If I had to pick one old vise to use without modification, I would probably choose the No. 2 It has 15″ jaws (compared to 11″ for the No. 1). It’s still not perfect, but its rigidity makes it an attractive vise.

Wentworth No. 1 saw vise, mounted on board.

Closeup of the cam mechanism on the Wentworth saw vises.
Gramercy saw vise
This vise, to my knowledge, is the only vise that is currently manufactured. It is based on the Wentworth No. 2 vise, and is, by all accounts, an excellent vise. They are sold on Tools for Working Wood’s website.
Finally, and mostly for the sake of showing off, here are a few pictures of the best saw vise ever made. It came off of an Acme saw filing machine, weighs in at about fifty pounds, and has jaws that are 28 inches long. They are, however, a bit hard to find, and usually go for a handsome sum when unearthed. If you do run across one, snatch it up quickly.

Acme Hand Saw Filer vise, front view.

Acme Hand Saw Filer vise.
Coming next – a look at some shopmade, wood-bodied saw vises, with brief discussions of their working qualities.
Pingback: Тиски PARAMO - Zerkalov Studio