…a live edge, that is.
After seeing several infill planes in desert ironwood, a customer sent me a piece of his own to use for a saw handle. This saw had two firsts for me – working with desert ironwood and using a live edge on a handle.

Front side of the handle blank.

Back side of the handle blank after scraping off most of the wax.

Back side of the handle blank after planing.
The wood showed a remarkable range of colors, figure, and patterns in a remarkably small space. But the most intriguing feature was the live edge that begged to remain a part of the saw. Fortunately, the customer gave me license to use it as I saw fit.
After looking at many possible layouts, the best location for the live edge was at the top of the handle. Placing it elsewhere would have either interfered with the grip of the saw or led to much of its loss when rounding over and shaping the contours.
The wood was nice to work with, although slightly prone to chipping. Finishing it, on the other hand, was a true struggle. Tru-Oil, my usual finish of choice, would not cover evenly, and never did completely dry. Shellac showed a lot of promise, but I was unable to get the smooth finish I wanted. Others with more experience have used shellac with great success, so I can only conclude that it was my technique.
Being stubborn (or persistent, depending on your point of view), I next tried a base coat of shellac followed by Tru-Oil. This was nearly successful, but I still had trouble getting a consistent sheen, and each coat of Tru-Oil took several days to dry thoroughly.
In the end, I removed all of the finish, sanded to a high grit, then buffed the bare wood with carnauba wax. It does not have the high gloss of a film finish, but it has a very consistent sheen, shows off all of the color and figure, and feels amazingly smooth in my hand. Thanks again to the customer for showing great patience as I did a bit of on-the-job learning.
This saw is a left-handed model, which simply means that the bolt heads and the stamp are on what is usually considered the backside.

Front side of the saw. Yes, this is a left-handed model.
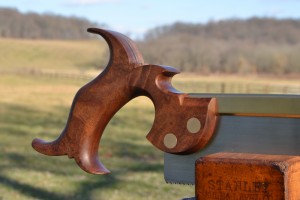
Closeup of the handle.

Closeup of the handle.

Closeup of the handle.

Closeup of the handle.